
Sprint 3 - Paranoia
Documents, documents, and more documents
This sprint for me as a designer was very heavy on design documentation. I focused solely on creating design keys and documents that would help the 3D artists gain a greater understanding of architectural assets, area access logic, and item placement through the map. The very first thing I did was implement existing documents I had created when I initially worked on pre-production for the game. I utilized the Environment Setting, Narrative Outline, and Narrative Devices documents I had created to provide more information to the rest of the team and help me to begin creating visual representations of each area within the game. These documents were a huge help, as they, combined with the map I had created, allowed me to bring together an isometric view of what every space would look like.


Making these maps took quite a bit of time, and not all of them were completed by the end of Sprint 3, but I had a few good examples completed. The very first one I made was the Exterior Access Key. This first map is the most simple, showing significant areas and whether they are able to be accessed readily by the player.

From there, I took that map and expanded upon it to create the Exterior Placement Map. This map details each significant section of the outdoors area of the map, visualizing where important set pieces go, as well as key item placements, and locked locations. This one was the base for what led the way to how the subsequent maps were realized, and it was the easiest to complete as it is a bit more abstract than the rest with just floating pieces of the landscape instead of full coherent views.

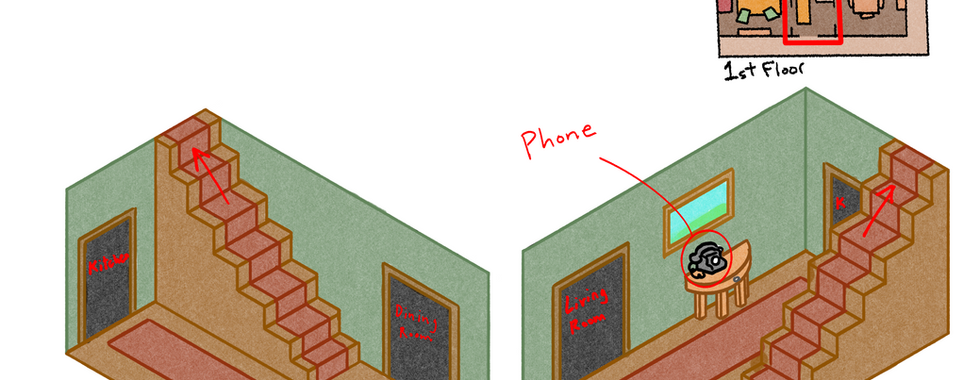
Once I completed that map, I moved onto the interior maps. I decided to take the style that I drew of the inside of the shed on the Exterior Placement Map and used that isometric style for the interior rooms of the environment. I wanted to be able to show as much as possible without having to draw the room too many times, so I opted for two opposing angles to capture as many sides as I could. During this sprint I completed the Entryway and Kitchen Placement Maps. Like the Exterior version, these maps visualize the locations of key set pieces, as well as important items. Since these are interior specifically, they also do the job of visualizing the general size and proportions of each room, as well as showing doorways and other transition points that lead into separate areas of the map.


Some other documents I made were the Wall and Roof Keys, which were directly intended for use by the Lead 3d Artist to help him visualize the style and proportions of the interior and exterior walls, as well as those same metrics for the roof of the house. I included design variations, as well as rough measurements for the height and thickness of each wall. The roof was something we went over together to figure out the exact shape that we wanted to achieve, as well as where we wanted to place the dormer for the attic, as we weren't entirely sure where we wanted to place the attic to be able to easily integrate it into the house. We ended up placing it over the primary bedroom to allow for the space needed for the ladder to unfold, as well as allowing the player to look out over the property instead of looking over the perimeter of the map.


Lastly, I created a Google form for play testers to fill out so that we could have readily available feedback and metrics about how the testers rated our game. I created it based off of the critique categories to make sure that we covered every area. I also finished up looking for references for the entire first floor of the house, finding images for every significant item within that space.


For the next sprint I will finish the remaining Placement Maps, and continue to gather references for the artists to use so that we can make the best environment possible for the game.